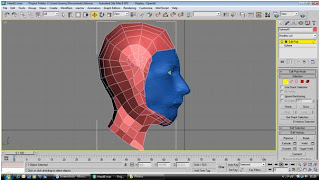
To create the rest of the head and neck, I went into edge mode and dragged out the edges from the sphere to continue down the back of the head to the neck. Using the topology I had drawn on in Photoshop as guidelines, I was able to create the required quads for this section. I then started to fill in the centre around the ear area. I worked in circles creating quads by pulling out edges and drawing in any that were needed. When all of the quads were drawn in, I started to move the individual vertexes around using the move tool until they were spaced out correctly.
I then set about extruding the lines out to the side to match the front image. This was quite tricking and in the end was easier when I hid the reference plates as they just seemed to get in the way. I used the soft selection tool to pull the side of the head out in a realistic manner. This worked quite well and I was able to tweak individual vertexes afterwards when turning the Soft Selection off. The area under the chin was also tricky working out exactly where each point had to go. After a bit of trial and error, I managed to get the basic shape setup.
I still had a gap under the chin but I left that for the moment. I then set about connecting the vertexes of the sphere to the front face. I used the Snap to Vertex tool to help with this. I then selected the face and in the modify panel, selected Attach. I then chose the back of the head to attach. This then connected the two pieces of the model together to form one single model. I then selected all of the vertexes and chose the Weld button in the modify panel to connect all the vertexes together so I could continue modelling.
With the two pieces connected, I then started to move vertexes around again in perspective view to get the join right between them. I turned on the turbosmooth to see the end result. I then kept tweaking vertexes until I had a smooth mesh. Unfortunately there were a couple of triangles near the bottom of the face which did result in a slight pinching effect but it was not really obvious.
I then continued to model underneath the chin, extruding lines to create the polygons that I needed to finish the neck. Once I had these created I spent some time moving them into position to create the remainder of the neck.
To start with, the head looked a bit too tall; this was because I had based the sphere around the top of my head, forgetting about my hair on top. To resolve this, I selected all the vertexes on the top of the head and moved them down into the head until they were at the correct height. I then adjusted the other vertexes on the side of the head that were now out of place.
Finally, I had a model of my head that, although didn’t look exactly like me, did have some resembling features!
Summary of Group Project
-
I feel I have worked hard on this group project to create accurately shaped
and sized components of the steam engine. When modelling my allocated parts
I f...
16 years ago

No comments:
Post a Comment